
Blog
Vehicle Owners: I-CAR and OEM Aligned Overspray Removal After Repair
An OEM- and I-CAR-aligned, least-aggressive workflow to remove overspray after repair: wash, 12"x12" test patch, clay, then D.A. polish. Stop if clearcoat...
For most overspray after a repair, start by washing the panel, then work a clay bar with abundant lubricant across the affected area. Only escalate to a light D.A. polish if claying alone doesn’t clear it, and stop entirely if the surface still feels rough after both steps or the overspray covers large, bonded patches. Always test an inconspicuous 12"x12" area first, and never run clay or polish dry.
TL;DR:
Claying and light polishing are effective for most overspray removal, but exceeding 0.2 mils of paint removal indicates panel refinishing is necessary.
Overspray from industrial contamination can etch into clearcoat faster, and testing a small patch helps determine if claying alone suffices.
Using proper tools like lubricant, plastic razor blades, and a dual-action polisher prevents paint damage during DIY correction.
Professional intervention is advised when overspray persists after claying and polishing or when paint thickness exceeds safe limits.
Contamination type, paint condition, and the presence of substrate show signs that only a body shop with measurement tools can properly address the issue.
Table of Contents
What Causes Overspray, and Is Overspray Removal After a Repair Different?
Step-by-Step: Wash, Test Patch, Clay Bar Technique, Then D.A. Polishing
When Professionals Escalate: Rotary Polishing, Wet-Sanding, and Chemical Removers
Car Geeks Collision Perspective: When to Trust DIY and When to Book a Repair
What Causes Overspray, and Is Overspray Removal After a Repair Different?
Overspray happens when airborne paint, sealant, or industrial coating settles on a surface it was never meant to touch. It’s common after a nearby repair job, a construction site upwind, or even a neighbor spraying a fence. The mechanics of removing it are largely the same regardless of the source, but overspray tied to a recent repair carries one extra wrinkle: the clearcoat underneath may already be thinner than stock if the panel was recently refinished, sanded, or blended.
That’s the standard industry framing worth knowing before you touch a clay bar: this isn’t just cosmetic cleanup, it’s a controlled mechanical process. Detailers and body shops alike describe overspray removal as shearing bonded particles off the clearcoat surface instead of dissolving them chemically, which is why claying works better than scrubbing. Scrub too hard or jump straight to a compound and you risk grinding contaminant into the paint instead of lifting it off.
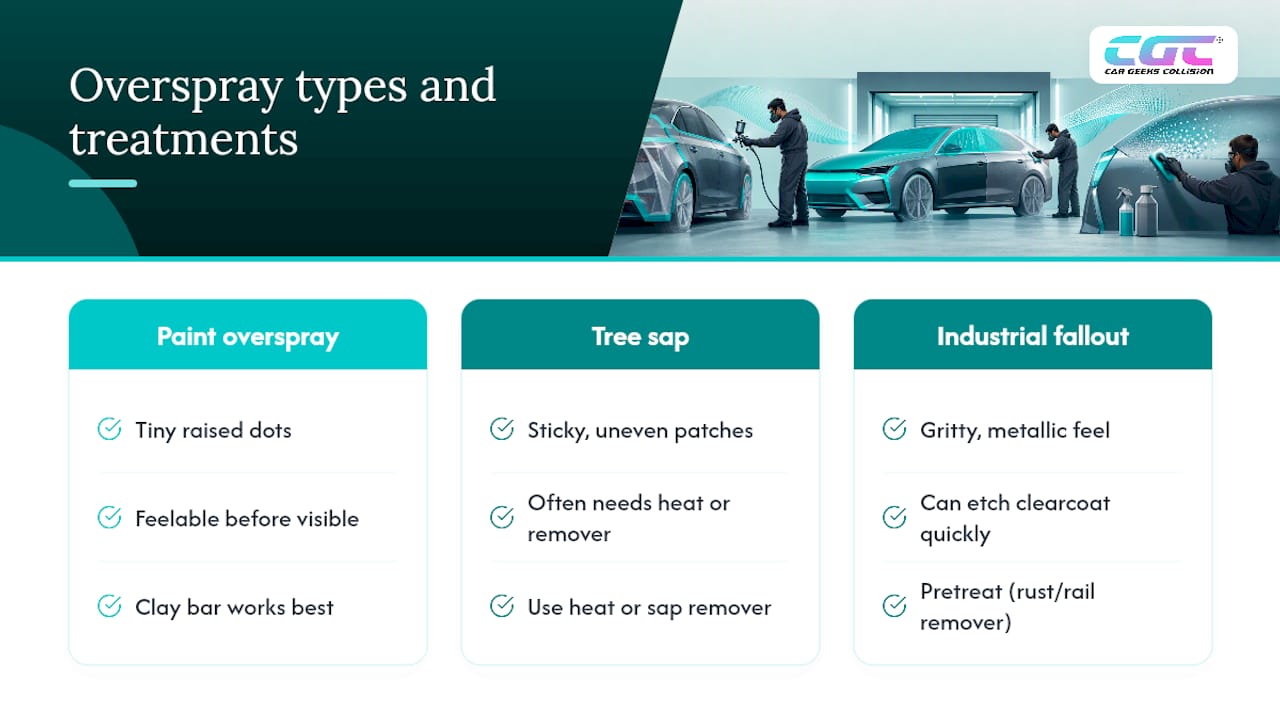
Not all overspray behaves the same way. Paint overspray tends to sit as tiny raised dots you can feel with your fingertips before you see them. Tree sap forms sticky, uneven patches that often need heat or a dedicated sap remover before claying does any good. Industrial fallout, rail dust, and rust-shop contamination usually feel gritty and metallic, and it can etch into clearcoat faster than paint overspray if left untreated. Knowing which one you’re dealing with tells you whether a clay bar alone will do the job or whether you need a specialty pretreatment first.
Assemble the Kit: What You Need and What to Avoid
You don’t need a professional detailing bay to do this correctly, but you do need the right materials on the bench before you start; for more guidance, see this Complete Guide to Vehicle Detailing. Skipping the lubricant step or grabbing whatever razor blade is in the kitchen drawer is how a ten-minute cleanup turns into a paint correction bill.
Washing essentials:
pH-balanced car shampoo (avoid dish soap, which strips wax and can dry out rubber seals)
Two wash buckets with grit guards (one for soap, one for rinsing your mitt)
Microfiber wash mitts and several plain-weave drying towels
Claying and polishing tools:
A light or medium-grade clay bar, sized to the job. Medium clay handles most bonded paint overspray, while light-grade bars work better on softer or older clearcoat.
Clay lubricant or a dedicated detail spray. This isn’t optional. Dry clay drags across paint and can inflict fine scratches worse than the overspray itself.
An optional dual-action (D.A.) polisher with a foam finishing pad and a light polish or compound for stubborn spots
Rotary buffers and wet-sanding kits belong on this list only as professional-only equipment. Leave them out of the DIY toolkit entirely.
Specialty items:
Plastic razor blades for glass work (never steel wool or metal blades)
Soft detailing brushes for trim, badges, and crevices
Nitrile gloves and eye protection
A paint-thickness gauge, if you own or can borrow one, plus a notepad to log test-spot results
A cheap paint-thickness gauge runs less than a tank of gas and pays for itself the first time it tells you to stop before you sand through clearcoat.
Step-by-Step: Wash, Test Patch, Clay Bar Technique, Then D.A. Polishing
This sequence follows the same least-aggressive-first logic that I-CAR outlines for overspray removal, scaled down for a driveway or garage instead of a body shop bay.
Wash the entire panel first. Use the pH-balanced shampoo and two-bucket method to strip loose dirt and road grime before you clay anything. Skipping this step means you’re grinding dirt into the paint along with the overspray.
Pick a test patch. Choose a 12"x12" section in an inconspicuous spot, near a door jamb or lower rocker panel works well, and clay it first. This mirrors the exact test-area size used in OEM service bulletins for overspray correction. Watch for two things: does the overspray actually lift, and does the paint’s shine or texture change afterward?
Clay the panel. Spray the lubricant generously, fold the clay into a flat patty, and glide it in straight, overlapping lines rather than circles. Check the clay every few passes; once it picks up grit, fold it over to expose a clean surface. Keep spraying lubricant continuously. A clay bar that drags instead of glides is a dry clay bar, and dry clay is how fine scratches happen.
Assess and repeat panel-by-panel. Once the test patch feels glass smooth, move to the next 12"x12" section. Most light-to-moderate overspray lifts entirely at this stage.
Polish only if needed. If the surface still shows faint texture after claying, move to a D.A. polisher on a low speed setting with a foam finishing pad and a light polish. Work the same 12"x12" area, wipe with a clean microfiber towel, and inspect under good light after every pass before moving on.
Pro Tip: Run your fingertips lightly over the panel after washing, before you clay anything. Overspray you can feel but can’t quite see is exactly what a clay bar is built to remove, and that quick check tells you where to focus without guessing.
Skip the shortcuts here. Household glass cleaner, bug-and-tar remover, or an abrasive kitchen scrub pad can strip wax, dull clearcoat, or leave swirl marks that are harder to fix than the overspray was. And if you’re tempted to reach for a metal razor blade because it’s what’s handy, don’t. Save that for the glass, and only the plastic version.
When Professionals Escalate: Rotary Polishing, Wet-Sanding, and Chemical Removers
If a full round of claying and a light D.A. polish still leaves texture behind, you’ve reached the edge of what’s reasonable to attempt at home. This is the point where a trained technician’s tools and measurements start to matter more than elbow grease.
Rotary polishing generates far more heat and cutting power than a D.A. machine, which means it can burn through clearcoat or leave permanent swirl marks in careless hands. Technicians measure paint thickness before starting so they know exactly how much margin they’re working with.
Wet-sanding at 2500-grit is the last resort in the stepwise progression, and it’s done in unidirectional strokes only. OEM guidance is explicit that a technician should not remove more than roughly 0.2 to 0.5 mils of clearcoat before the panel needs refinishing rather than correction.
Chemical overspray removers can help with stubborn water-based contamination but are riskier on oil-based industrial coatings, which may require a stronger solvent that also threatens the clearcoat underneath. Technicians patch-test on an inconspicuous spot and neutralize the chemical afterward, something worth mimicking on a small scale if you go this route yourself, but only on painted surfaces designed to tolerate it.
Pro Tip: If you’re at the wet-sanding decision point, you’re not really deciding whether to sand anymore, you’re deciding whether the panel needs refinishing. That’s the honest read of where the “last resort” step actually leads for most drivers without a paint gauge and years of practice.
Once a panel shows clearcoat loss at this stage, or a second and third pass of professional correction still hasn’t restored an even finish, refinishing is usually the more economical and durable path forward compared to chasing diminishing returns with more sanding.
Glass, Trim, Wheels, and Engine Bay: Tailored Techniques
Painted panels get most of the attention, but overspray doesn’t stop at the body lines. Each surface type calls for a different tool, and using the wrong one is how minor contamination turns into a bigger repair.
Glass should only be scraped with a plastic razor blade, held at a low angle with plenty of glass-safe cleaner as lubricant. Metal blades scratch glass and can nick weatherstripping.
Trim and rubber are more porous than painted clearcoat, so aggressive claying can embed clay residue into the material instead of lifting overspray off it. A mild all-purpose cleaner and a soft detailing brush handle this more safely.
Wheels and the engine bay respond well to a citrus-based degreaser and stiff brushes, but keep any solvent well clear of exposed electrical connectors, sensors, or nearby painted surfaces.
Small parts and tight crevices, badge edges, weatherstripping seams, and cowl gaps, are where forcing a scraper does more harm than good. If overspray is packed into a seam you can’t reach safely, that’s a sign to let a detailing professional with disassembly experience handle it rather than prying at it yourself.
Never reach for steel wool on any of these surfaces. Metal fibers can lodge in seams and rust over time, causing corrosion problems long after the overspray itself is gone.
Paint-Thickness Limits and Signs You Need a Professional
Every escalation step in this process has a ceiling, and it’s a measurable one rather than a gut feeling. I-CAR and OEM guidance both point to the same rule: start with the least aggressive method, and if you escalate to sanding or heavy compounding, measure paint thickness before and after. Removing more than about 0.2 mils during correction work is the caution point, and going past 0.5 mils total generally means the panel needs refinishing rather than further correction.
You don’t need a gauge to catch the warning signs, though. Watch for these:
Persistent roughness after a full claying pass and a round of light D.A. polishing usually means the contamination is bonded deeper than surface-level correction can reach.
A visible color or shine mismatch compared to the surrounding panel often signals that clearcoat has already thinned unevenly.
Any spot where you can see substrate or primer through the clearcoat is an immediate stop, no exceptions.
If you cross into any of those signs, a shop will typically measure thickness with a gauge, perform controlled wet-sanding within safe limits, and blend the refinish so it matches the surrounding paint under every lighting condition, something a driveway setup simply can’t replicate.
Polish, Seal, and Protect After Overspray Removal
Claying is a mechanical process, and even light claying leaves microscopic marring on the clearcoat surface. A finishing polish restores that gloss and closes up the fine marks before you seal anything in. Applying a protective layer afterward also keeps the freshly decontaminated paint from bonding with the next round of airborne debris.
You have three realistic options for that protective layer:
Carnauba wax gives the deepest, warmest shine but needs reapplication every 4 to 6 weeks.
Paint sealant lasts several months, resists water and light chemical contamination better than wax, and suits daily drivers well.
Ceramic coating offers the longest protection window and the strongest resistance to bonded contaminants, but it costs more upfront and usually calls for professional application to bond correctly.
Blend your polish work outward past the treated area so the gloss transitions smoothly rather than leaving a visible line at the edge of your test patch. Going forward, parking away from active construction, painting bays, or industrial areas, and keeping a sealant or ceramic layer current, cuts down how often you’ll deal with this again.
Car Geeks Collision Perspective: When to Trust DIY and When to Book a Repair
Overspray removal is one of the few auto body issues where the DIY path genuinely works for most drivers, provided the sequence is followed and nobody skips the test patch. We say that as a collision and refinishing shop handling work daily across South Florida, including structural repair, paint matching, and ADAS calibration for various vehicle types.
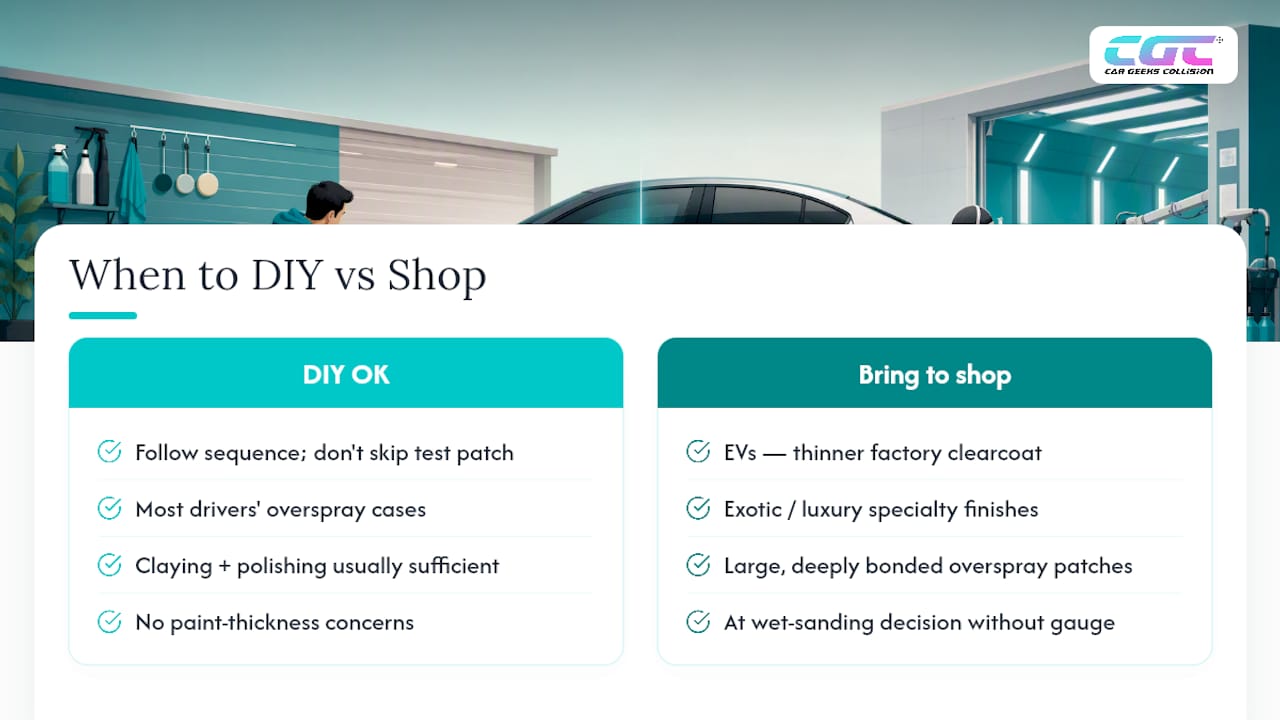
Where we routinely see cars come in after a failed DIY attempt: EV owners who didn’t realize their factory clearcoat runs thinner in spots than legacy gas vehicles, exotic and luxury owners dealing with specialty finishes where a mismatched polish compound is nearly impossible to hide, and anyone with large, deeply bonded overspray patches that outlast a full claying and polishing cycle. Paint-thickness concerns fall in the same category. If you don’t own a gauge and you’re already at the wet-sanding decision point, that uncertainty alone is worth a shop visit.
If you decide to bring a vehicle in, expect a paint-thickness reading on the affected panel and a professional assessment on whether correction or refinishing makes more sense. Bring any documentation from the original repair, especially if the overspray came from a nearby job, since that history can matter for insurance claim assistance if the contamination resulted from someone else’s work.
— Car Geeks Collision
Get Expert Help for Overspray Beyond DIY Repair
Most overspray comes off with a wash, a clay bar, and patience. But when claying and light polishing don’t fully clear it, or when you’re staring at a paint-thickness gauge wondering if you’ve already gone too far, that’s exactly the point where professional repair shops pick up where the driveway method leaves off. They handle the panels DIY correction can’t safely finish, from measuring clearcoat thickness before any sanding to blending a refinish so it disappears into the surrounding paint.

This matters even more for EV, luxury, and exotic owners, where a mismatched polish compound or an over-aggressive wet-sand can turn a small overspray problem into a much larger repair. Our auto body repair and paint services cover exactly this kind of correction, alongside full collision and structural repair for South Florida drivers. If your vehicle is an EV or has specialty finishes, our EV body repair team can confirm whether your clearcoat has the margin left for further correction. If you’ve hit the point where the test patch isn’t fully clearing or you’re not sure how much clearcoat is left to work with, call Car Geeks Collision in Hollywood, Florida, for a paint-thickness check and a straight answer on whether correction or refinishing is the right move.
Sources
How to Remove Car Overspray From Paint Glass And Trim Safely - CarXplorer
Does WD-40 Remove Overspray From Car Paint? A Quick Fix? - CarsBibles
FAQ
How Do You Get Dried Overspray Off a Car?
Wash the panel first, then work a clay bar with generous lubricant over the affected area in straight, overlapping passes. Dried overspray usually lifts within a few passes; if texture remains, a light D.A. polish on the same test area typically finishes the job.
Does WD-40 Remove Overspray?
WD-40 can loosen very light, water-based overspray in some cases, but it’s not a reliable or paint-safe primary method. Patch-test it first and favor a dedicated clay bar and lubricant for anything beyond the lightest contamination.
Will Goo Gone Remove Overspray?
Goo Gone is formulated for adhesive residue, not bonded paint particles, and it can leave an oily film that interferes with polishing or waxing afterward. A clay bar with proper lubricant remains the safer, more predictable first step for actual overspray.
Can You Buff Out Overspray?
Yes, but only after claying doesn’t fully clear it. A dual-action polisher with a light compound handles most remaining texture; rotary buffing and wet-sanding are technician-level escalations that carry real risk of clearcoat damage if done without paint-thickness measurements.
When Should I Stop DIY Overspray Removal and Call a Shop?
Stop if the surface still feels rough after a full claying pass and light D.A. polishing, if you notice a color or shine mismatch, or if you can see substrate through the clearcoat. At that point, a shop can measure paint thickness and determine whether correction or refinishing is the right call.
Recommended